Introduction
Welcome to AvoLingo's Teacher Management Platform documentation! Here, you'll learn how to effortlessly integrate lectures, exercises, and books into AI avatars. With AvoLingo, students can practice anytime, anywhere, ensuring a dynamic learning experience.
1: Accessing the Teacher Portal
To access the AvoLingo Teacher Portal, simply visit https://app.avo-lingo.com. Once there, enter the email address and password provided to you. If you haven't received login credentials, please reach out to your school's administrator to create an account for you.
2: Creating your Avatar

Start by clicking the "My Avatar" button. Your Avatar's profile box will appear.

-
Click the circle image to add your profile picture. Please ensure it's in PNG or JPEG format and less than 1 MB in size.
-
Type your display name.
-
Select one of the six available voices. You can listen to a demo of each voice by clicking the "Play Demo" button.
-
Optional: Add personal information such as your personality traits, how you address your students, hobbies, etc.
2.1: Editing your Avatar
3: Creating a lecture
3.1: Editing the Lecture
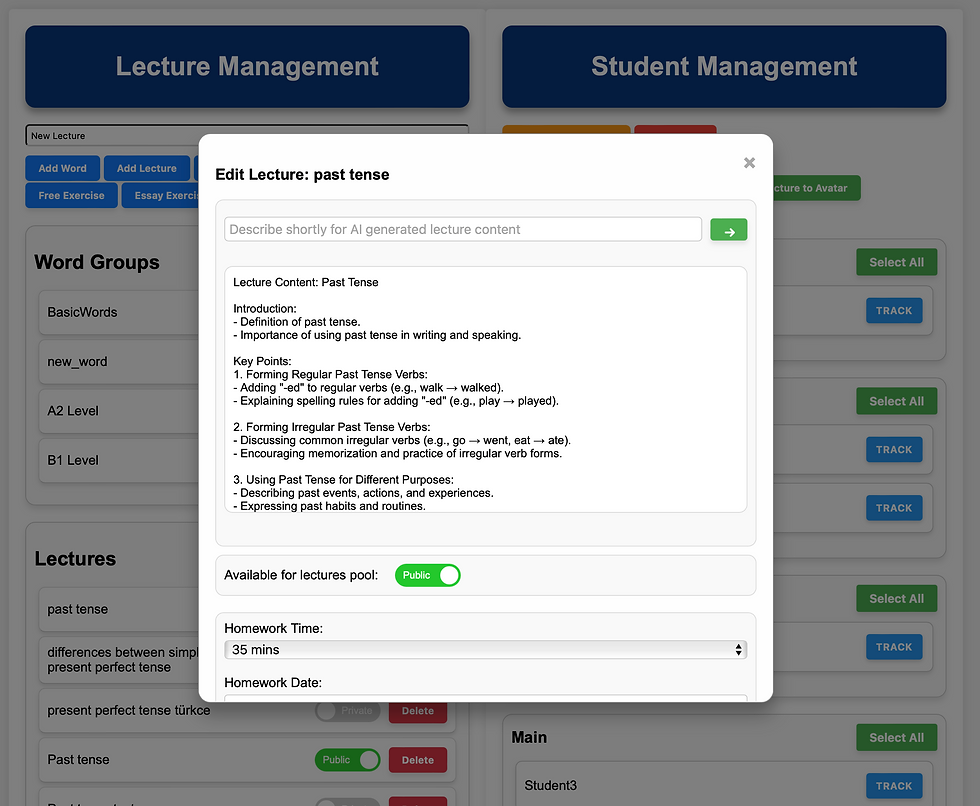
Start by entering a name for your lecture. Then, click the "Add Lecture" button. Your lecture box will appear below.

Step 1: Click on the lecture box you wish to edit.
Note: You can also create other modules by clicking the corresponding button in the same way!
Step 2: A text field will pop up, allowing you to enter your lecture material. You can provide instructions to the avatar, such as "teach the past tense topic," or write the entire lecture content. Alternatively, you can request exercises on a specific topic "make exercises about past tense topic". The choice is yours.
Additionally, above the text field, you can simply enter the topic's name, such as "past tense," and click the button. The AI will automatically generate lecture material for you!
Step 3: Click the "save" button to keep your changes

3.2: Making Lecture Available on your profile
To make a lecture visible to students, click the "Public" switch next to the lecture; when it turns green, students can see it on your profile.

4: Homework
Step 2: Find and click on the specific lecture or exercise you want to assign as homework.
Step 3: In the homework settings panel, set the following:
-
Homework duration: Enter the time in minutes that students should spend interacting with your AI avatar.
-
Due date: Select the date by which the homework should be completed.
Step 4: After setting these parameters, click the "Save" button to confirm your choices.
4.1: Setting up the Homework

4.2: Assigning Homework to Students
Step 1: In the student management section, you'll see a list of your students.
Step 2: To select students for the homework assignment:
-
Click on each student's name you want to assign the homework to.
-
The name box will turn green to indicate selection.
-
You can select multiple students if needed.
Step 3: Once you've selected all intended students, locate and click the "Assign Homework to Student" button.
Step 4: After setting these parameters, click the "Save" button to confirm your choices.

Step 1: Navigate to the Lecture & Exercise section in your dashboard.

5: Tracking your students
You can track your students' homework activity as follows:
Find the student you want to track and click the "Track" button in their box.
The tracking information is divided into two parts:
a. General Overview:
-
View AI's overall feedback and analysis of the student's performance.
b. Specific Homework Details:
-
Click on a specific homework assignment to see: • Duration of student's interaction with the AI • Conversation topics between the student and AI • AI's responses • Homework completion status
This tracking feature allows you to monitor your students' progress and engagement with their assigned homework.
